WOOD SHOWER MAT– Anyone with a fiberglass shower unit knows that the floor always feels a little crackly and possibly weak. We found a tip that suggested a bamboo or teak wood mat to distribute the weight. We located one at World Market that fit perfectly. It looks nice, dries fast and distributes our weight more evenly when we step into the bathroom area.  We could also use it outdoors as a mud mat if we needed to! And in a small camper space, dual purpose is important!
SHOE CUBBY/CABINET– Under that shower floor was a tiny little storage cabinet. After looking it over carefully, we realized that it was the perfect amount of space for shoe storage. So we removed the cabinet door and cut it open to be a larger opening. Then trimmed the edges with wood. It now has a mat inside and we can kick our shoes in there when we come inside the camper. This little cubbyhole keeps the shoes out of the way, but handy.


PRODUCE DRAWER– One of the kitchen changes that makes a huge difference for a small adjustment is the drawer enlargement. Originally the camper had a drawer above the kitchen sink.

The drawer did not fully utilize the cabinet behind it, and was too small for most practical uses. I wanted a place to store fresh produce and breads. So the modification began.

Once the cabinet was secured, we cut the opening larger and painted inside. Then we purchased a metal drawer unit from Home Depot. (these come in all different sizes and configurations). It attaches to the bottom of the cabinet. 


FRESH WATER SYSTEM–We also added a separate fresh water tank and faucet. This is an independent system which has its own water lines, 12v pump and faucet at the sink. This will be the tank system for drinking water. This allows us to operate the main system with unfiltered park water while having a way to refill bottles of drinking water that we can fill with filtered water. This dual system will give us greater flexibility in Latin and South American countries. With both tanks full we will have 46 gallons of tank water, plus 6 gallons in the hot water tank.


AWNING– We installed a Fiamma awning on the side of the camper. This awning has legs that can reach the ground, or slide in to the mounting points attached to the side of the camper. 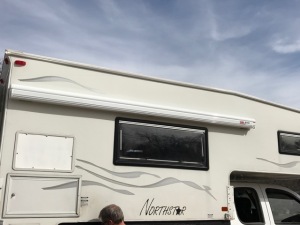 We chose to place the awning above the “living room” window so that it will also shade the inside of the camper to help manage the temperature on hot, sunny days.

TRUCK BLING– With all these changes to the camper, we knew the truck was feeling left out. So we added some goodies to the GMC also! She got a fancy black grill guard and black nerf bars. The grill guard looks great, and should help in the event of a front end incident. The nerf bars look good too, and make a perfect step to help boost into the truck and knock the mud off your shoes before climbing in.


Supervising all this work is exhausting. So Zeb climbed all the way up to the top bunk bed to take a nap! 

Looking good! Hope to follow you around one day in BP!
Charles- We have not decided what to do with the VW Van. Currently it is parked. We have a storage option. Or we might sell it. Are you interested?
what did you (or are you) going to do with the old vehicle ?
Boy you guys are really coming up with some great ideas, love the shoe thingy. and the cabinet is great. You should be on the road soon
The shoe space where the tank access area is a great idea. I remove my access panel while doing winter camping so even more heat can go to the tanks. I have had the thought of putting a little molding around it for storage like that as well.
I can not add anything to the bathroom floor, I am 6’4″ and that would make it a pain in the neck (lol) for me with the height. We do use something like that for the outside shower though. It does come in handy for sure!
Nice mods!
I love reading these!
On 2/5/17, It’s not a slow car, it’s a fast house!
great job! Thanks for sharing the updates.
Great job!
You seem to have extracted every last inch of storage space out of that camper body and the front end looks so good. This is making me take a second look at our campervan to utilise the nooks and crannys for storage.